Haiden Hibbert
If you’ve ever looked into building an online course on your Squarespace website, you’ve probably noticed that Squarespace’s built‑in course tools are great for getting started — but pretty limited once you want to grow.
You can upload videos, organize lessons, and sell access, but what if you want to:
- Offer payment plans or subscriptions?
- Bundle your course with digital products or memberships?
- Drip content over time or update lessons easily?
- Manage multiple courses from one dashboard?
That’s where MemberSpace comes in.
With MemberSpace, you can create, sell, and deliver your entire online course — right on your Squarespace site — with full control over pricing, structure, and student access. It’s simple to set up and built to scale with your business.
Here’s how to do it.
Sell online courses on Squarespace!
The easiest way to accept membership payments or one-time charges for digital products like online courses, communities, content libraries, and more — all from your own website!
Get started for free! 5 minutes to set up.
Step 1: Create a MemberSpace Account
Start by creating your free MemberSpace account.
Once you’ve signed up, you’ll connect MemberSpace to your Squarespace site:
- Copy the short code snippet from your MemberSpace dashboard.
- Paste it into your Squarespace site settings (under Website → Pages → Custom Code → Code Injection → Header.)
- Save your changes — and you’re done!
You’ll now see a small login button appear on your site. This is where your students can sign up, log in, and access their course content.
Installation takes less than a minute, and your Squarespace site is instantly ready to start selling courses.
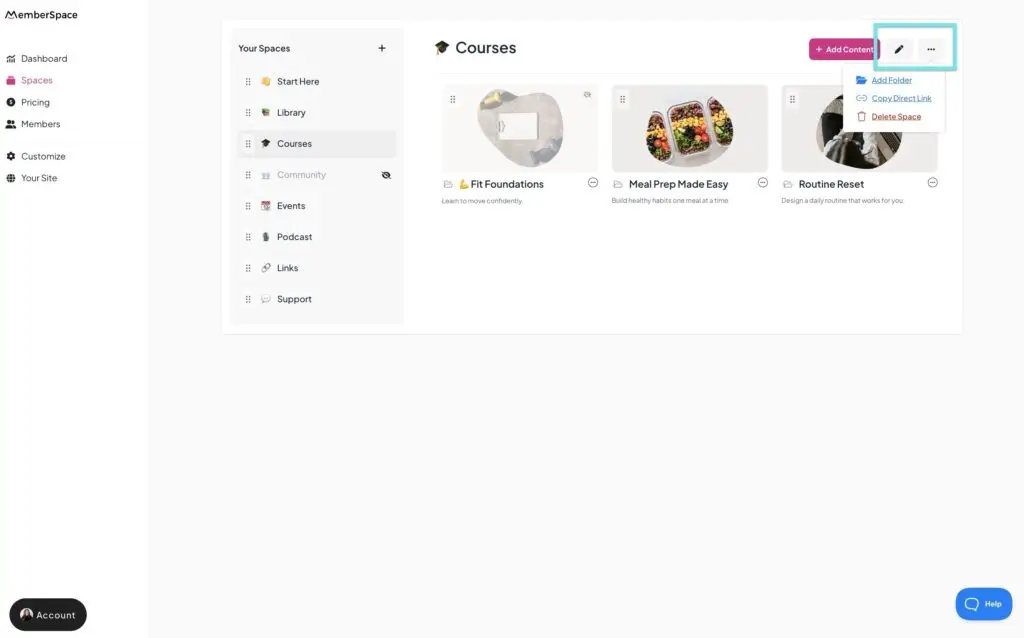
Step 2: Upload Your Course Content to MemberSpace
Next, it’s time to build your course.
Inside MemberSpace, you’ll create a private Space that only enrolled students can access.
You can upload or embed all types of content, including:
- Videos (YouTube, Vimeo, or Wistia embeds)
- PDFs (worksheets, slides, or reading materials)
- Audio files (podcasts or trainings)
- Images and graphics
- Written lessons or blog‑style posts
You can organize your content however you like — by module, lesson, topic, or format — and update it anytime without touching your Squarespace design.
Want to release lessons gradually? You can drip content over time to keep students engaged and prevent overwhelm.
This flexibility means your course can grow and evolve right alongside your business.
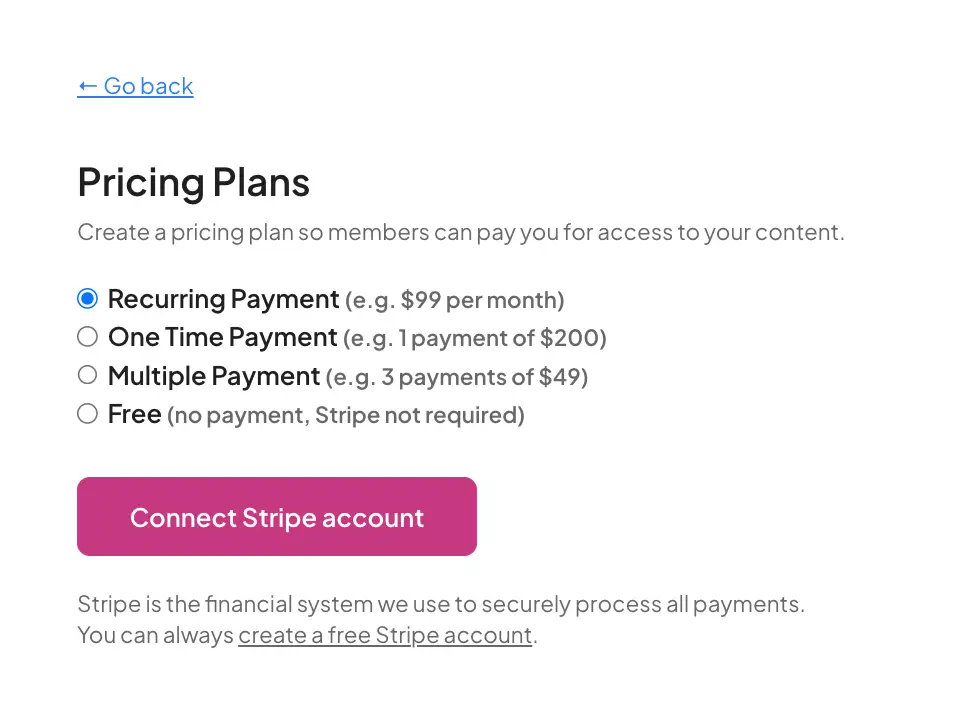
Step 3: Create Your Pricing Plan
Now it’s time to decide how you want to sell your course.
MemberSpace integrates with Stripe, giving you multiple ways to accept payments securely — including credit cards, Apple Pay, Google Pay, and Link.
You can choose from several pricing models:
- One‑time payment — Perfect for standalone courses.
- Recurring subscription — Great for ongoing memberships or access to multiple courses.
- Payment plan — Ideal for higher‑priced programs or coaching bundles.
- Free access — Perfect for lead magnets, bonus lessons, or community perks.
You can also offer discount codes, free trials, or tiered pricing to attract new students and increase conversions.
This level of flexibility simply isn’t possible with Squarespace’s built‑in course checkout — but with MemberSpace, it’s built in from day one.
Step 4: Launch Your Course!
Once your course content and pricing are ready, it’s time to share it with the world. You’ll get a direct signup link from MemberSpace for your course, so you can promote it to your audience.
Here are a few ways to launch effectively:
- Add a call‑to‑action button on your Squarespace homepage that links directly to your course sign‑up page.
- Send an email to your list announcing your new course and any early‑bird discounts.
- Promote it on social media with behind‑the‑scenes content, sneak peeks, or testimonials.
- Create a dedicated landing page in Squarespace that highlights your course benefits, outcomes, and pricing options.
Your students can sign up, pay, and start learning — all from your Squarespace site, without ever leaving to another platform!
Why Use MemberSpace Instead of Squarespace’s Course Feature
Squarespace’s built‑in Courses feature is a great starting point for creators who want to sell simple, one‑time online courses directly from their website. You can add a Course page, organize your content into chapters and lessons, upload videos or PDFs, and sell access through Squarespace’s checkout.
But while it’s easy to use, Squarespace Courses has some real limitations once you want to grow or customize your course experience.
Here’s how MemberSpace compares — and why it’s the better choice if you’re serious about building a flexible, scalable course business:
| Feature | Squarespace Courses | MemberSpace |
|---|---|---|
| Course structure | Fixed “chapter + lesson” format | Fully customizable — organize by module, topic, or format |
| Number of courses | One course per Course page | Create and manage unlimited courses from one dashboard |
| Pricing options | One‑time payment only | One‑time, subscription, payment plan, or free |
| Bundles & memberships | Not supported | Combine multiple courses or digital products into bundles or memberships |
| Content delivery | All content available at once | Drip lessons over time or schedule releases |
| Student access | Basic course viewer | Secure, branded member dashboard on your Squarespace site |
| Payment flexibility | Squarespace Commerce checkout only | Stripe integration — credit cards, Apple Pay, Google Pay, Link |
| Scalability | Best for single, standalone courses | Built to scale with multiple courses, tiers, and pricing models |
Squarespace gives you a clean, simple way to host and sell a course.
MemberSpace gives you the flexibility to turn that course into a full‑fledged business — with multiple pricing options, recurring revenue, and a seamless student experience that grows with you.
Planning Your Course
Before you start uploading content, take a little time to plan your course.
A clear structure makes everything easier to build and market.
1. Define your course goal
Ask yourself: What transformation am I helping students achieve?
Keep your focus narrow — one clear outcome is easier to teach and easier to sell.
2. Outline your content
Break your topic into modules or lessons. A simple structure might look like:
- Module 1: Getting Started
- Module 2: Core Skills
- Module 3: Implementation
- Module 4: Wrap‑Up + Next Steps
3. Choose your content formats
Decide how you’ll teach — video, written lessons, audio, or a mix. Start with what’s easiest to produce.
4. Plan your student experience
Think about what happens after someone buys.
Do they get a welcome email? A bonus resource? A community invitation? Small touches like this make your course feel more personal and professional.
Promoting Your Course
Once your course is live, it’s time to get people enrolled. Here are some proven ways to promote your Squarespace course:
1. Use your existing audience
Your email list, social followers, and past clients already trust you — start there.
2. Share behind‑the‑scenes content
Show your process: recording videos, designing lessons, or building your course hub. It builds excitement and connection.
3. Offer early access or a beta round
Invite a small group to join at a discounted rate in exchange for feedback or testimonials.
4. Create free content that leads naturally to your course
Host a free workshop, publish a blog post, or share a mini‑guide that introduces your topic — then invite readers to go deeper with your course.
5. Keep promoting after launch
Don’t stop talking about your course once it’s live. Share success stories, student wins, or new updates to keep momentum going.
FAQ: How to Create an Online Course on Squarespace
1. Can I create an online course directly on Squarespace?
Yes! Squarespace now includes a built‑in Courses feature. But if you want more control over how your course is structured, priced, and delivered — MemberSpace can offer more flexibility and features.
2. How do I sell my course on Squarespace with MemberSpace?
Simply install MemberSpace on your website in 30 seconds. You can then set up one‑time payments, subscriptions, payment plans, or free access — all managed directly from your MemberSpace dashboard.
3. Can I create multiple courses?
Absolutely. MemberSpace lets you create and manage unlimited courses, bundles, and memberships from one dashboard.
4. Can I drip lessons or release content gradually?
Yes! You can schedule content to release over time, keeping students engaged and motivated.
5. Can I include my course as part of a membership or digital product bundle?
Definitely. That’s one of MemberSpace’s biggest advantages — you can combine your course with memberships, communities, or other digital products to increase your revenue.
6. What payment methods can I accept?
MemberSpace integrates with Stripe, so you can accept credit cards, Apple Pay, Google Pay, and Link.
7. Is my course content secure?
Yes. MemberSpace protects your lessons behind a secure login, ensuring only paying students can access them.
8. Do I need coding skills to set this up?
Not at all. MemberSpace is built for non‑technical creators. Installation takes about 30 seconds, and everything is managed from your dashboard.
Final Thoughts
Squarespace gives you a beautiful foundation for your brand. MemberSpace gives you the flexibility to turn that foundation into a scalable online course business.
You can structure your lessons however you want, sell your course in multiple ways, and deliver a seamless, secure learning experience — all from your own website. Let us know if you have any questions, and good luck!
Sell online courses on Squarespace!
The easiest way to accept membership payments or one-time charges for digital products like online courses, communities, content libraries, and more — all from your own website!
Get started for free! 5 minutes to set up.