

What You’ll Need to Set Up a Member Directory
Creating a members-only directory on Squarespace really comes down to a couple things:
- Setting up your directory on your Squarespace website
- Adding membership functionality with MemberSpace, so only members can access it. You can also set up pricing tiers and sell access to other exclusive content. It’s totally flexible to work with your business model!
Step 1: Install MemberSpace on Your Squarespace Site
To make your directory private so only members can access it, you’ll first need to add membership functionality to your site.
Squarespace does offer built-in membership tools, but they’re fairly limited. If you want more control over pricing options and how your content is organized, MemberSpace gives you much more flexibility.
With MemberSpace, you can:
- Lock any page on your site
- Sell subscriptions, one-time purchases, or payment plans
- Offer both free and paid plans
- Gate digital downloads
- Organize exclusive content inside Spaces
- Manage all of your members in one place
Installing MemberSpace is simple. You just paste a small snippet of code into your Squarespace site’s header, and it connects to your existing pages. There’s no need to rebuild your site or deal with complicated setup.
Once it’s installed, you’re ready to create your directory page.
Step 2: Create Your Directory Page
Next, create the page that will hold your directory.
In Squarespace, simply add a new page and design it like you would any other page on your site. The goal is to keep it clean, easy to browse, and helpful for your members.
There are a few ways you can format your directory.
Simple List or Table
A straightforward list works well for professional networks or member groups. Each listing might include:
- Name
- Title or company
- Short description
- Contact information
- Website link
This approach is simple and easy to maintain, especially if your directory isn’t extremely large.

Grid Layout
If you want something more visual, you can create a grid layout using Squarespace blocks. This works well for directories featuring businesses, creators, or professionals.
You might include:
- Profile photos or logos
- Short bios
- Social links
- Call-to-action buttons
A grid layout can make the directory feel more polished and easier for members to explore.

Add Search and Filters with Community Box
If you want a more advanced directory with search and filtering features, you can integrate a tool like Community Box.
Community Box lets you create a more dynamic directory experience with features like:
- Search functionality
- Category filters
- Structured listings
- Member profiles
You can embed Community Box directly into your Squarespace page, making it a great option if you’re building a larger directory with many listings.
Once it’s embedded on your page, you can simply lock that page with MemberSpace so only members can access it.

💡 Quick Tip: Keep It Easy to Browse
No matter which format you choose, try to keep your directory easy to scan and navigate.
Your directory should be:
- Visually clean
- Organized logically (alphabetically, by category, or by location)
- Focused on the most important information
Most directories work best when they include:
- Name
- Short description
- Contact details
- Photo or logo (if relevant)
Try to avoid cramming in too much information. The goal is to help members connect with each other, not overwhelm them.
Step 3: Lock the Directory Page with MemberSpace
Once your directory page is ready, the next step is to lock it so only members can access it.
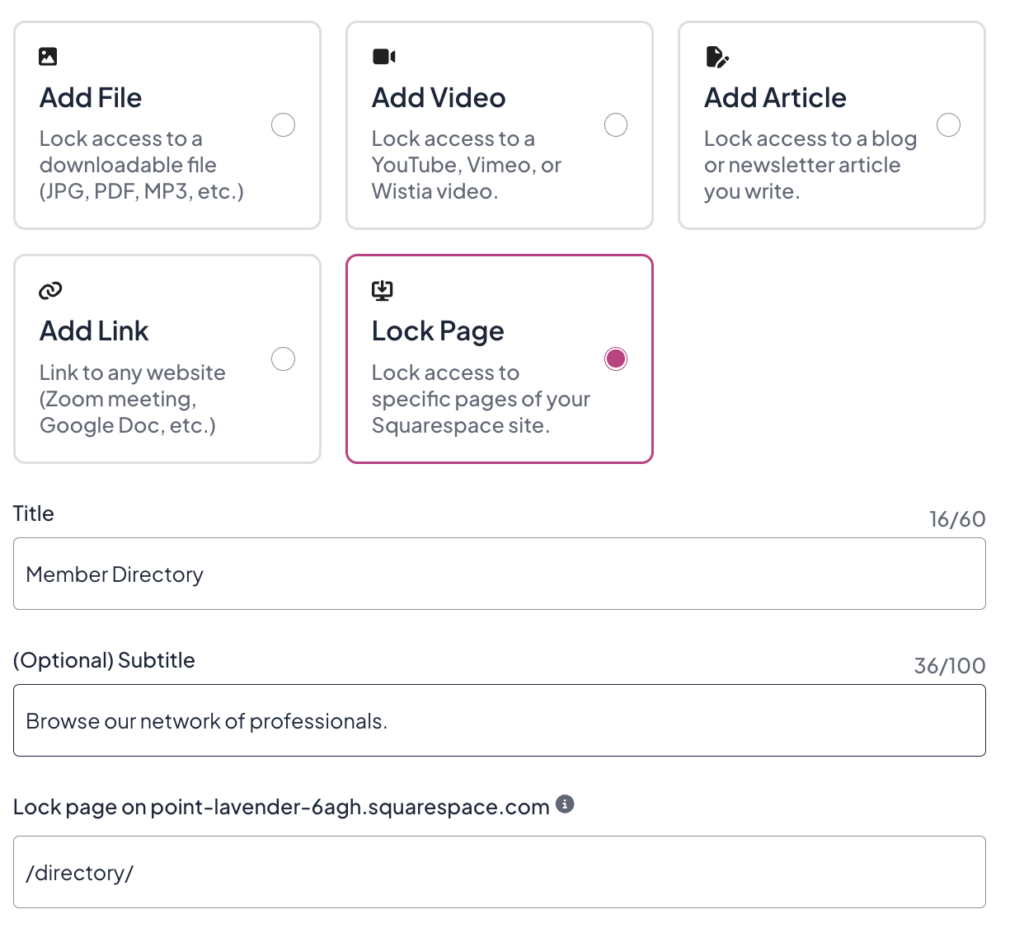
Inside your MemberSpace dashboard:
- Click Add New Space
- Choose the Lock Page option
- Paste the URL of your directory page
MemberSpace will then lock that page and place it behind your paywall.
Now only members with the correct plan will be able to access the directory.
Step 4: Create a Pricing Plan
Finally, decide how you want to charge for access to your directory.
MemberSpace gives you several pricing options, including:
- Free memberships
- Recurring subscriptions
- One-time payments
- Payment plans
- Multiple membership tiers
The right pricing model depends on the type of directory you’re creating.
For example, a professional networking directory or job board often works well as a subscription, while a curated business directory might make more sense as a one-time purchase.
If your membership includes other benefits like exclusive content, events, or resources, you could also create multiple pricing tiers.
Once you create your pricing plan, simply connect it to the page you’re locking. Members will need to sign up for that plan before they can access the directory.
Squarespace Member Directory FAQs
Can I create a directory using Squarespace without MemberSpace?
Yes, but it will be more limited. Squarespace’s built-in membership tools offer fewer payment options and less flexibility when it comes to protecting content. MemberSpace gives you more control as your membership grows.
Can I charge different prices for different directories?
Yes. You can create multiple pricing plans and sell access to different content within in tier.
Do I need to know how to code?
No. Installation just involves pasting a small code snippet into your site. Everything else can be managed through your MemberSpace dashboard.
Can I update the directory later?
Absolutely. You can edit your Squarespace page anytime, and your members will automatically see the updates.
Final Thoughts
A member directory might seem like a small feature, but it can add a lot of value to your membership.
It helps members connect with each other, discover useful contacts, and get more out of your community.
If you already have a Squarespace site, you’re closer than you think. Create your directory page, lock it with MemberSpace, set your pricing, and start offering access to your members. Let us know if you have any questions, and good luck!