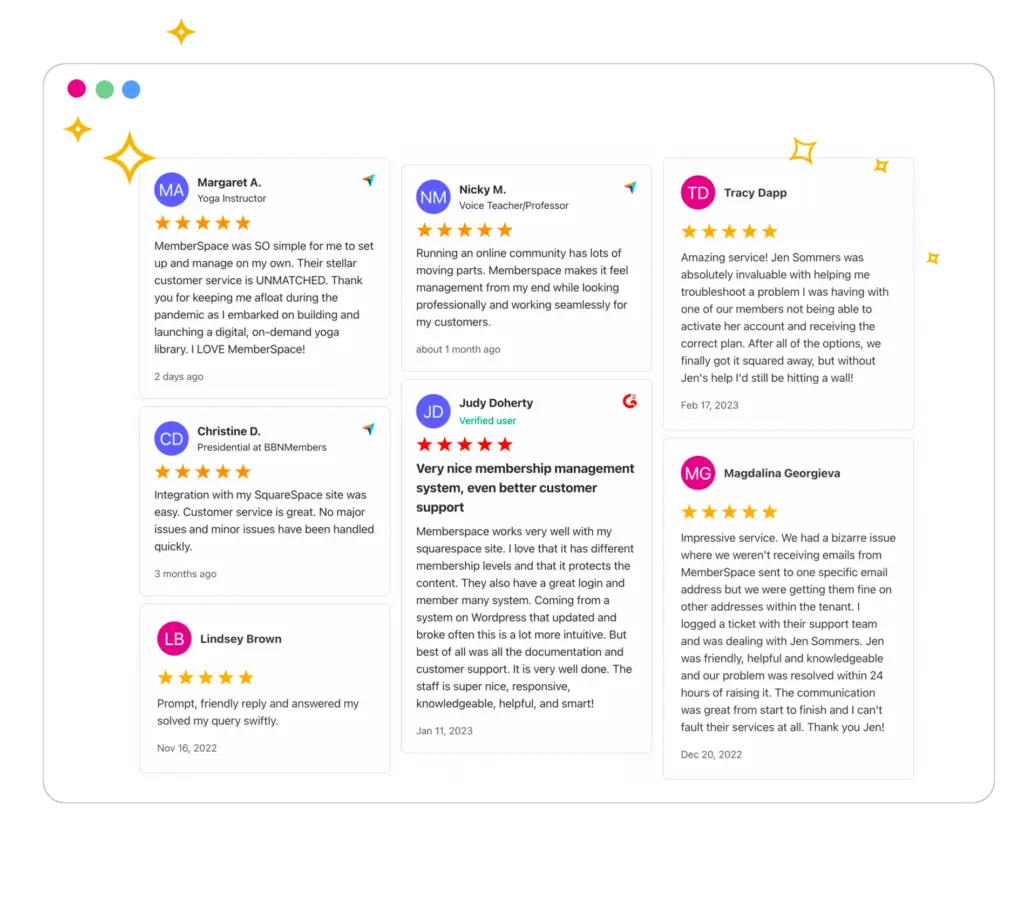
Paid newsletter platform and software
Add paid newsletter to any website or blog.
Easily add member-only access to any part of your website or blog. Create member plans, lock pages, and accept monthly subscription payments. MemberSpace is free to use. No credit card required.
No credit card required.

How it works
It has never been easier to create a paid membership newsletter.
1. Add our snippet of code
Add our little snippet of code in the source code of your blog or website so you can experience the awesome of MemberSpace
2. Protect newsletter pages
Tell us which section of your website you want to protect and make members-only. We’ll do the rest.
3. Start selling access!
We’ll handle the payments, signups and logins. We only get paid, when you get paid so we are here to help!
MemberSpace reviews
Read real customer reviews about MemberSpace.
Paid newsletter subscription site examples
Here are a few examples of successful paid newsletter subscription sites using MemberSpace.

Integrating MemberSpace with our site was one of the best things we’ve ever done. Simple to get started and packed with features. Big fans!
Sibi Murugesan, Head of Platform at Calm Fund

Why use MemberSpace?
Our software provides everything you need to launch, build and grow your membership business on any platform. Below is a list of our features and integrations.
No coding required.
You shouldn’t need to hire a developer or have technical skills to build and run a membership site. MemberSpace is a simple solution for non-technical people.


Your website, any platform.
Customer service is our top priority.

Migrate for free.
Migrating your membership to different software can seem like a daunting task. We make it easy, simple, and painless. So if you have an existing membership system, we’ll help you migrate to MemberSpace for free. Learn more about migrating to MemberSpace.
How to Start a Paid Newsletter Subscription Site with MailChimp
If you’re a digital creator, you’ve probably heard of or subscribed to a newsletter powered by Substack. This platform is often synonymous with creators monetizing their newsletters — but it’s not the only way to earn money from emails. Many entrepreneurs find it easier and more profitable to create a paid newsletter with MailChimp and a Substack alternative like MemberSpace.
Should You Start a Paid Newsletter?
The idea of replacing your job entirely with a paid newsletter is appealing. It’s important to make sure that creating a paid newsletter is the right kind of work for you, though. A lot of effort goes into maintaining a paid newsletter that regularly generates happy subscribers!
A paid newsletter may be a great fit if you:
- Already have an active free email list
- Are comfortable writing
- Repackage your blog posts into a downloadable resource
- Can commit to a firm schedule for regular email updates
- Have something of value to offer beyond your free content
Paid newsletters typically provide extra value that goes above and beyond the content in your standard marketing blasts. Paid subscribers may receive:
- Expanded print or audio content
- Early or discounted access to videos and courses
- Special members-only website access
- Exclusive downloads (like eBooks and guides)
- One-on-one coaching
- “Office hours” and “ask me anything” sessions
On an individual level, paid newsletter subscriber costs are typically low — often in the $5 to $10 per month range. These small payments can add up big time for a creator, potentially generating full- or part-time income.
Not sure what you can offer paid newsletter subscribers? Look at our guide to developing a membership business idea and finding your minimum viable product for paid newsletters
Choosing a Paid Newsletter Platform
Substack often touts the fact that there’s no cost to join. Instead of a monthly subscription fee, users forfeit 10% of every subscriber payment (plus credit card processing fees).
This pricing model can undoubtedly make sense for users with small email lists. If you’re planning to grow your subscriber base, though, it becomes expensive — fast. There’s no cap to that 10% fee that Substack takes from each paid subscriber.
Paid newsletter businesses that generate $400 or more every month can see significant savings by switching to MemberSpace as a Substack alternative.
If you’ve got 1,000 subscribers paying five dollars each, you’re generating $5,000…and forking over $500 every month to Substack.
MemberSpace offers a free plan option for startups as well as a paid plan with additional features for more seasoned membership businesses.
How to Create a Paid Newsletter with Mailchimp and MemberSpace
It’s easy — we’ll show you how!
First Steps for Starting a Paid Newsletter with Mailchimp
First things first — decide on your newsletter focus and make your accounts.
Sign up for a free MemberSpace plan
Create a free MailChimp account
Make a free Stripe account to process subscriber payments securely.
Register for a free Zapier account to link MemberSpace and Mailchimp.
Build the Website Pages for Your Paid Newsletter
Using one of the many CMS platforms MemberSpace is compatible with, build three web pages:
1. A landing page that is live for anyone to visit:
2. A thank-you message that appears after they subscribe:
3. A Member Page that’s only accessible to paid newsletter subscribers and allows them to access past content. This page can be as simple as a list of links to the text version of previous emails.
Set Up MemberSpace to Power Your Paid Newsletter
If this is your first time using MemberSpace install it on your website before proceeding.
After you’ve linked your website and MemberSpace account, log in to the MemberSpace backend and click Member Pages at the top.
Go back to your website and locate the URLs of the second and third pages you created above — the ones that are only for paying subscriber’s eyes. Once you’ve got the URLs, click the pink ‘Protect Member Pages’ button in MemberSpace.
Enter your page URLs one at time and complete the short form.
After adding the Member Page, go back to the top menu and click Member Plans.
Click the pink ‘Create Member Plans’ button. Under the ‘What type of Member Plan is this?’ drop-down menu, choose ‘Recurring Payment’.
Fill out the plan details, including price and frequency. You can create more than one member plan type if you’d like to allow monthly and annual subscriptions.
In addition to the plan details, we also specify here which Member Pages our paid subscribers can access and where they get redirected to after they signup or login.
Don’t forget to turn on your plan to begin selling paid newsletter subscriptions!
You can modify the form fields that new subscribers must complete when signing up for paid newsletter access. This function is excellent for collecting additional data you can use to segment your subscriber list further.
Click ‘Customize’ in the top menu bar.
Then click ‘Sign Up Fields’.
From there, you can add any form fields and checkboxes that you’d like.
Connect MemberSpace and MailChimp using Zapier
Zapier is a free service that allows you to push membership data from MemberSpace out to over 1,000 third-party services like Mailchimp, Google Sheets, Hubspot, and more.
Zapier uses ‘triggers’ that happen on one end (like a new subscriber signing up via MemberSpace) to carry out an ‘action’ on the other (such as adding them to your paid newsletter list in MailChimp). Together, this creates a workflow called a ‘Zap’. You only have to set up a Zap once, and then it works for you in the background.
We’re going to set up this Zap:
- Trigger: A new paid subscriber joins via your membership website
- Action: They are added to your Mailchimp paid subscriber list
Log into your new Zapier account and click ‘Make a Zap’.
In the ‘Trigger’ box, search for and click on MemberSpace.
Under ‘Trigger Event’, select ‘New Membership’.
Click the blue ‘Continue’ button and log into your MemberSpace account when prompted. Next, pick your member plan(s) from the drop-down box.
Click the blue ‘Test Trigger’ button to confirm the Zapier and MemberSpace link. If you are just setting up MemberSpace for the first time, you can add yourself as a subscriber to test the process after you are done setting up Zapier.
If the test is successful, you’ll see this message:
Click ‘Continue’ to advance to the action portion of your Zap.
Search for and select Mailchimp. And select ‘Add/Update Subscriber’ as the action event.
Click continue and log in to your Mailchimp account. If prompted to authorize Zapier access, click ‘Allow’.
Your Zapier page will refresh and show a form with different options for your new Mailchimp action.
If you are on a free Mailchimp plan, select your list name under ‘audience’. Users on a paid Mailchimp tier can set up a custom audience specifically for this paid mailing list if desired. Fill out the rest of the form and click ‘continue’.
Zapier will now add your test subscriber data to Mailchimp and verify the connection is active.
After finishing your first Zap, repeat this process and create another one to unsubscribe members in Mailchimp when they cancel their plan.
Promoting and Growing Your Paid Email Newsletter
Starting your paid email newsletter is the tricky part. Now that you’ve jumped that hurdle, it’s time to promote it!
- Use your social media pages to tease exclusive, paid-subscriber-only content
- Occasionally send all or part of a paid subscriber newsletter out to your free email subscribers, so they can see what they’re missing out on
- Set up a free trial period for potential members to experience your paid newsletter
- Do a cross-promotion with another creator you admire, where you each promote the other’s paid email newsletter to your subscriber lists
Make the Most of Your MemberSpace Account
Once you’ve begun to build up paid newsletter subscribers in Mailchimp, you may want to consider trying new membership offerings to grow your business further. MemberSpace lets you create multiple Member Plans and even connect to more than one website! You can expand your platform to include different email newsletter subscriptions, courses, eBooks, and even private podcasts.
Want more inspiration? Browse through our resources, listen to the MemberSpace podcast , or rummage around in our handy membership toolbox to discover all the ways you can grow your new membership business!