Team MemberSpace
If you’ve ever tried to build an online course on your Showit website, you’ve probably realized something pretty quickly — Showit doesn’t have built-in course functionality.
That’s usually when people start looking for another platform to host their course. But here’s the good news: you don’t have to send your students somewhere else.
With MemberSpace, you can build, host, and sell your entire course — all right on your Showit site.
Let’s walk through how to do it, plus a few tips for planning, promoting, and running your course successfully.
Table of Contents
Launch a course on your Showit website!
The easiest way to accept membership payments or one-time charges for digital products like online courses, communities, content libraries, and more — all from your own website!
Get started for free! 5 minutes to set up.
Why Host Your Course on Your Showit Site?
When your online course lives on your own website, everything feels more cohesive — for you and your students.
No extra logins. No redirecting people to another platform. No juggling multiple tools.
Your members can log in, access their content, and explore any other digital products or resources you offer — all from the same space. It’s simpler, cleaner, and gives your brand a more professional feel.
Planning Your Course
Define the promise
Before building your course, identify the outcome students will achieve.
A simple way to do this is to complete the sentence: “By the end of this course, you’ll be able to…”
This promise helps you stay focused on the transformation you’re delivering and gives potential students a clear reason to enroll.
Break it into modules and lessons
Once you’ve defined the outcome, work backward.
Ask yourself:
What does someone need to learn or accomplish to reach that result?
The major milestones become your modules, and the smaller steps within each milestone become your lessons.
For example, a podcasting course might include:
- Module 1: Planning Your Podcast
- Module 2: Recording Your Episodes
- Module 3: Launching Your Podcast
Within each module, create lessons that cover one specific topic at a time. Keeping lessons short and focused makes it easier for students to stay engaged and make progress.
Building Your Course with Showit and MemberSpace
Step 1: Add MemberSpace to your Showit Website
First things first — create your MemberSpace account. It only takes a few minutes, and you’ll be ready to connect it to your Showit website right away.
MemberSpace works with any Showit plan, so you don’t need to upgrade or change anything about your current setup.
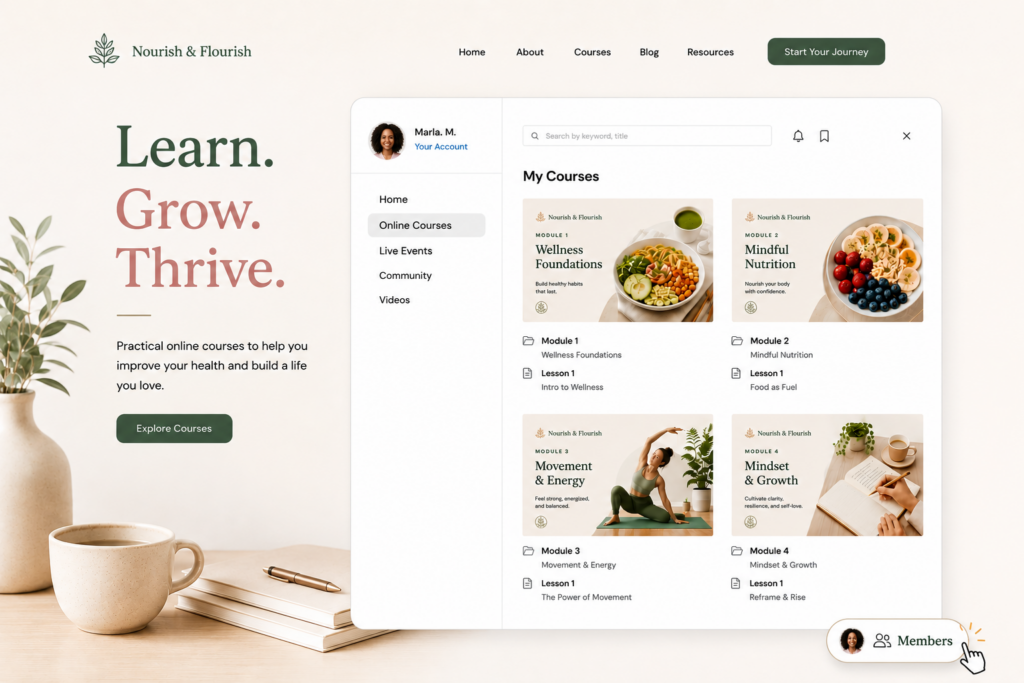
Once you’ve signed up, you’ll install MemberSpace on your site. When you do, you’ll see a small floating button appear in the bottom-right corner of your Showit pages.
That button is where your customers will log in, sign up, and access their course content.
When they log in, they’ll see a clean, beautiful content hub — where all your course material lives, like the one below. You can customize how it looks and what’s included, so it fits your brand perfectly.
Step 2: Set up your course structure
Now it’s time to organize your course inside MemberSpace.
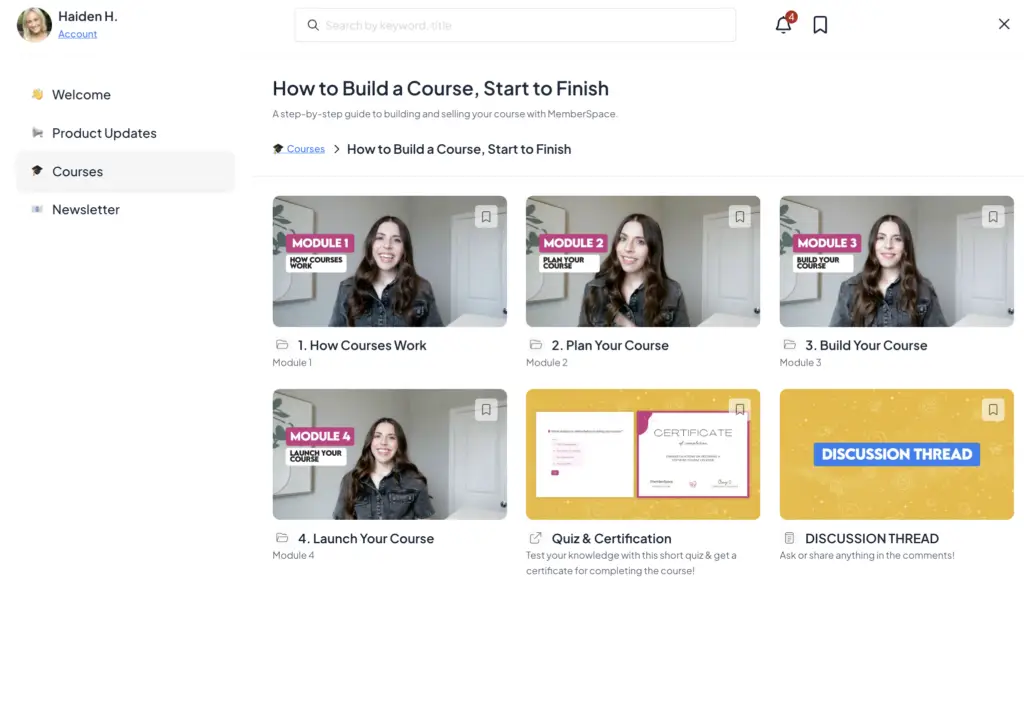
First, create a Space, which will serve as the home for your course content. Think of a Space as your private members-only area where students can access lessons, resources, quizzes, and discussions.
If you plan to offer multiple courses, you can create a general Courses Space and then create a separate folder for each individual course inside it.
For example:
- Courses
- How to Build a Course, Start to Finish
- Launch Your Membership
- Marketing Fundamentals
Within each course folder, create a folder for each module. This makes it easy for students to navigate through your content in the correct order.
For example:
- How to Build a Course, Start to Finish
- Module 1: How Courses Work
- Module 2: Plan Your Course
- Module 3: Build Your Course
- Module 4: Launch Your Course
This simple folder structure keeps your course organized, makes it easier to add new content later, and creates a clear learning path for your students as they progress through the material.
Step 3: Add your lessons

Now it’s time to start adding your course content.
Inside each module, you’ll create individual lessons for your students to work through. How you organize them depends on the type of content you’re offering.
If a lesson only contains one piece of content — like a video, article, or downloadable resource — you can add it directly inside the module folder.
If a lesson includes multiple resources, such as a video, worksheet, checklist, and discussion prompt, create a dedicated lesson folder and place everything related to that lesson inside it.
As you’re building, keep your lesson names clear and consistent. A simple structure like “Lesson 1.1: Introduction” or “Lesson 2.3: Creating Your Content Plan” makes it easier for students to follow along and track their progress.
You can upload files, embed videos, add written content, and include links to external resources all within your course structure.

Step 4: Test your students with a quiz (optional)

Quizzes aren’t required, but they can be a great way to keep students engaged and reinforce what they’ve learned.
A simple option is to create your quiz using a tool like Typeform or Google Forms, then link to it from your course. Many course creators add quizzes at the end of each module so students can review key concepts before moving on.
You can also include a final assessment at the end of the course if you want students to demonstrate what they’ve learned before receiving a certificate or completing the program.
To make quizzes easy to find, consider linking to them directly from the relevant module as well as your main course page. This gives students multiple opportunities to complete them as they progress through the course.
Step 5: Include opportunities for student interaction

One of the best ways to improve course completion rates is to make students feel like they’re learning alongside other people instead of working through the material alone.
Consider giving students a place to ask questions, share wins, and discuss what they’re learning as they move through your course.
Inside MemberSpace, you can enable comments and reactions on lessons, allowing students to engage directly with your content. You can also create a dedicated discussion thread on your course’s main page with a simple prompt such as:
“What’s your biggest takeaway from this module?”
or
“What’s one action you’re planning to take this week?”
These small opportunities for interaction can help build community, encourage accountability, and create a more engaging learning experience for everyone involved.
Step 5: Launch your course
Next, decide how you want students to pay for your course. MemberSpace integrates with Stripe, giving you several flexible options depending on your business model.
Free course: Offer a free mini-course or micro-course to introduce people to your content, build trust, and give potential customers a taste of what it’s like to learn from you. This can be a great lead magnet for growing your email list or promoting a larger offer.
One-time payment: Charge a single fee for lifetime access to your course. This is the most common option for standalone courses where students pay once and keep access indefinitely.
Multiple payments: If your course has a higher price point, consider offering a payment plan. Breaking the cost into several smaller payments can make your course more accessible and help increase conversions.
Recurring subscription: If you plan to continuously add new courses, resources, workshops, or community features over time, a recurring subscription may make more sense. This model works especially well for memberships that provide ongoing value beyond a single course.
The best pricing structure depends on your goals, but the good news is that MemberSpace gives you the flexibility to offer any of these options — and change them as your business evolves.
Online Course Tutorial
To see a live online course tutorial with MemberSpace, check out our livestream recording below.
Promoting Your Course
Building a great course is only half the work — you also need people to find it.
Here are a few ways to spread the word without feeling salesy:
1. Use your existing audience
Start with the people already following you — your email list, social media, or clients. They already trust you, which makes them more likely to buy.
2. Share behind-the-scenes content
Show your process: planning lessons, recording videos, or designing your course hub. It builds excitement and helps people feel part of the journey.
3. Offer early access or a beta round
Invite a small group to join at a discounted rate in exchange for feedback or testimonials. It’s a great way to test your content and gather social proof.
4. Create free content that leads naturally to your course
Host a free workshop, write a blog post, or share a mini-guide that gives people a taste of what you teach. Then invite them to go deeper with your course.
5. Keep promoting after launch
Don’t stop talking about your course once it’s live. Share success stories, lesson highlights, or new updates regularly to keep momentum going.
FAQ
Can I really host everything on Showit with MemberSpace?
Yes! MemberSpace handles all the membership and content protection for you. You can upload your course materials directly to MemberSpace or embed videos and links — no need for a separate course platform.
Do I need any coding or technical skills?
Nope. Installation is copy-and-paste simple, and MemberSpace walks you through the setup. If you can update your Showit site, you can set this up.
Can I drip content over time?
Absolutely. You can set release dates for lessons so content unlocks gradually — perfect for keeping students engaged week by week.
What payment methods can I accept?
MemberSpace integrates with Stripe, which supports all major credit cards, Apple Pay, Google Pay, and more.
Can I offer multiple courses or bundles?
Yes! You can create multiple Spaces for different courses, products, or membership tiers — all managed from one dashboard.
What if I already use another course platform?
You can keep using it if you want, or gradually migrate your content into MemberSpace. Many creators prefer having everything in one place once they see how easy it is to manage.
Can I add community features?
Definitely. You can create Spaces for private groups, member directories, or bonus content — so your course can grow into a full membership experience.
What if I want to update my course later?
You can edit, replace, or add new content anytime. Your members will instantly see the updates when they log in.
Final Thoughts
You don’t need a separate platform to build and sell your online course. With Showit and MemberSpace, you can keep everything — your website, your content, and your community — in one place.
It’s simpler for you, smoother for your students, and better for your brand.
If you’ve been waiting for a sign to finally launch that course — this is it.
Launch a course on your Showit website!
The easiest way to accept membership payments or one-time charges for digital products like online courses, communities, content libraries, and more — all from your own website!
Get started for free! 5 minutes to set up.